Teaching Kids About Emotions Through Play: My Honest Guide for Parents
Teaching Kids About Emotions Through Play :Let me start with something I don’t usually say at the beginning of an article: I wish I’d known this sooner.
Not because I didn’t love my kids. But because I spent way too many years trying to explain emotions to them instead of playing through them. I’d say things like, “Use your words” or “Take a deep breath,” and then wonder why it wasn’t working.
Here’s what I finally figured out: children don’t process emotions the way adults do. They don’t learn by listening to lectures. They learn by doing, feeling, and playing.
I spent months researching emotional development in children—talking to educators, reading studies, and most importantly, testing these approaches with my own kids. What I found changed everything. And I think it might change everything for you too.
Let me walk you through what I discovered.
Why Play Matters for Emotional Intelligence
Here’s the thing about kids and emotions: they’re experiencing huge feelings with very little vocabulary to describe them. Imagine feeling furious but only having the word “mad.” Or feeling anxious but not knowing what that even means.
Emotional intelligence isn’t something children are born with. It’s something they develop over time through experience and guidance . And the most effective way to help them develop it? Through play.
Research consistently shows that playful activities are among the most powerful tools for building emotional skills. Studies have found that structured play-based interventions can significantly improve emotional awareness, empathy, and self-control in young children .
A 2025 study on preschool-aged children found that play-based methods—including role-playing, storytelling, art activities, and drama—are the most effective approach for developing emotional intelligence. Children who engage in these activities learn to recognize emotions, express feelings appropriately, and understand the emotional states of others .
The Four Key Benefits:
- Play is natural for kids. They don’t feel like they’re “learning.” They feel like they’re having fun.
- Play creates emotional safety. When kids are playing, they’re more willing to explore difficult feelings.
- Play builds vocabulary naturally. Through stories, games, and role-play, children learn the words for their feelings.
- Play builds empathy. When children act out different emotions, they literally practice seeing the world from someone else’s perspective.
The Building Blocks of Emotional Play
Before we get into specific activities, let’s talk about what we’re actually trying to build. I’ve found that emotional development through play focuses on five key areas :
1. Self-Awareness
Helping children recognize their own emotions. What does anger feel like in their body? How do they know when they’re sad?
2. Self-Management
Learning to regulate emotions. What can they do when they feel overwhelmed? How do they calm down?
3. Social Awareness
Understanding other people’s emotions. How can they tell if a friend is sad? What does empathy look like?
4. Relationship Skills
Building healthy connections. How do they share, cooperate, and resolve conflicts?
5. Responsible Decision-Making
Making thoughtful choices. What happens when they act out of anger versus acting with intention?
Activities for Babies and Toddlers (Ages 0-3)
You might think emotional learning starts when kids can talk. It doesn’t. It starts from day one.
The good news is you don’t need fancy activities. Social-emotional learning happens naturally through daily interactions . When you hug your baby, play peek-a-boo, make silly faces, or sing a lullaby, you’re building skills like bonding and emotional expression.
What to Do:
Use Books with Emotion Talk
When you read board books together, point out facial expressions. Say things like, “That girl looks sad,” or “Those little pigs look scared.” Make the faces yourself—show your baby what sad or scared looks like .
Sing Emotion Songs
Music is powerful for little ones. Sing “If You’re Happy and You Know It” and actually act out the emotions. Watch “When You Feel So Mad” from Daniel Tiger together. Music keeps short attention spans engaged while teaching about feelings .
Encourage Peer Play
When babies play together, they learn essential skills like nonverbal communication and cooperation. Even if they’re just sitting near each other, those interactions matter .
What I Learned:
My daughter didn’t understand the word “frustrated” at 18 months. But when I sang the Daniel Tiger mad song and showed her what frustration looked like, she started making the same face when she felt that way. She wasn’t speaking in complete sentences, but she was learning to communicate her feelings.
Activities for Preschoolers (Ages 3-5)
This is the golden age for emotional play. Preschoolers are developing language quickly, love imaginative play, and are starting to understand that other people have feelings too.
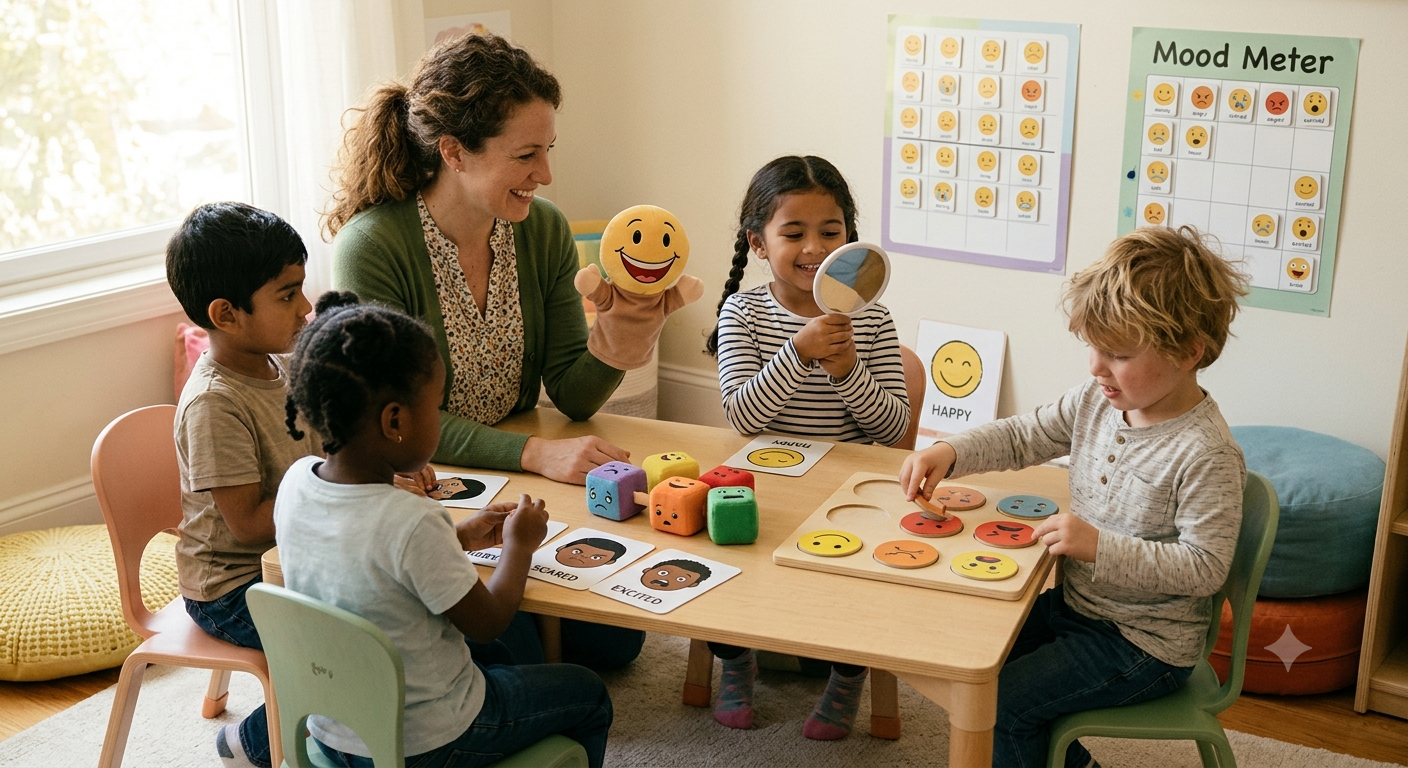
Emotion Picture Cards
Create cards with faces showing different emotions—happy, sad, angry, surprised, scared. Have children draw the faces themselves if possible. Use these cards to play games:
- Show a card and ask children to name the emotion
- Ask children to show you what that emotion looks like on their own faces
- Use the cards for a game of charades (act out the emotion without speaking)
The Feelings Wheel
The Feelings Wheel breaks emotions down into basic categories and then gets more specific . Start with the basics—happy, sad, mad, scared—and help children expand their vocabulary. Watch a clip from Pixar’s Inside Out to spark conversations about feelings .
Mirror Play
Put a mirror in your calming corner. When children visit that space, encourage them to use the mirror to notice how their emotions match the face they’re making . You can also:
- Pair mirrors with story time. Ask children to show an emotion that a character is feeling
- Play a game where you call out an emotion and children mimic it in the mirror
Matching Games
Create cards with emotion words and faces. Help children match the word to the expression. This builds vocabulary and critical thinking skills .
What I Learned:
We made an “emotions book” with pictures of my daughter making different faces. She loved looking at herself and naming the emotions. That book became her favorite—she’d bring it to me and say, “Show me happy!” Then she’d make the face. It was simple, but it worked.
Activities for Elementary School Kids (Ages 6-11)
By elementary school, kids have more emotional vocabulary and can handle more complex activities. These activities go beyond just naming feelings to understanding why we feel certain things.
Emotion Blocks
Use interconnecting plastic blocks to explore feelings. When a child names a feeling—like anger or fear—encourage them to choose a block that’s a good color and size for that feeling. Write the feeling word on the block.
As you work through what happened, add other feelings, choosing different blocks and connecting them. Some children may notice only two feelings, while others will name more .
The blocks help children organize their feelings and understand that we often have more than one feeling in a given situation. For example, a child who expressed anger about going to school might realize they actually feel anxious underneath the anger .
Emotions as Detectives
Show children photos of people displaying various emotions. Ask them to be “detectives” and identify which emotion is being shown. Guide the discussion: What clues did they use? Did they notice the eyebrows? The eyes? The mouth?
Take it a step further by showing pictures of scenarios—children playing at a playground or standing around a broken toy. Ask what emotion(s) the children in the pictures might be experiencing .
Self-Soothe Box
Create a “self-soothe box” that children can use when they have big feelings . This can include:
- A picture of family, pets, or happy memories
- A small toy like a teddy bear
- Playdough or a fidget toy
- A small puzzle
- A “hug jar” filled with hearts to give to someone when they need comfort
When children feel overwhelmed, they can go to their box and take what they need to calm down. This builds self-regulation skills.
Role-Playing and Puppet Shows
Use puppets to act out scenarios: two friends arguing over a toy, a child who’s feeling left out, or someone who’s nervous about a new situation. Ask children: “What would you do if you were Mr. Puppet? How could we help them?”
Journaling
For older elementary kids, journaling can help them process emotions. Prompt them with questions like:
What I Learned:
The emotions blocks activity was a game-changer for my daughter. She’d had an explosive tantrum over something small, and I realized later she was actually worried about a school situation. The blocks helped her untangle those feelings. She went from “I’m just angry” to “I’m angry AND scared AND frustrated.” That was huge.
Activities for Middle School and High School (Ages 11-18)
Emotional development doesn’t stop when kids hit adolescence. In fact, it becomes more complex. Teens face bigger social pressures, academic stress, and emotional ups and downs.
The Worry Iceberg
Help students understand that what we see on the surface isn’t always the whole story. Have them think about a situation that made them anxious. What could they see? What was happening underneath?
Fishbowl Discussions
Encourage active listening and communication skills with this technique. A small group of students discusses a topic while others watch and take notes. Then the discussion opens to everyone .
Positive Self-Talk
Model and reinforce positive self-talk. Use a self-talk poster with phrases like “I can do this” and “It’s okay to make mistakes.” Encourage teens to write encouraging messages to themselves .
Relaxation Techniques
Try yoga, meditation, or guided visualizations with teens. These activities develop physical and mental skills like deep breathing, balance, and mind-body connection—all of which aid in self-awareness and emotional regulation .
What I Learned:
The Worry Iceberg activity was surprisingly effective with my teenager. Instead of just being anxious about everything, he started identifying what was really underneath. Sometimes it was fear of failure. Sometimes it was feeling overwhelmed. Sometimes it was something else entirely. The iceberg helped him name it.
The Mirror and Photo Method
One of my favorite tools for all ages is using mirrors and photos to teach emotion recognition. It’s simple, effective, and kids love it.
Take Pictures of Your Kids: Take pictures of your child making faces that show different emotions. Label each one and display them around the house. These will serve as constant reinforcement of emotion recognition .
Emotion Detective: Show photos of people displaying various emotions. Ask children to be “detectives” and identify the emotions. What clues did they use?
Create a Class Emotions Book: Take pictures of students showing various emotions. In the captions, explain why they might be experiencing each emotion. This book will become a classroom favorite .
The Self-Soothe Box Project
This activity from the eTwinning program is brilliant . Here’s how to do it:
- Have children gather items that bring comfort—a picture of family, a small toy, a fidget, a puzzle.
- Create a “hug jar.” Children draw and cut out tiny hearts. They share hearts with each other and fill a jar. When a child has big feelings, they can go to the box and take a heart to give to someone when they need a hug .
- Include visual reminders of people, places, and memories that are important.
- Include soothing sounds or songs.
- Encourage children to use the box when they need to calm down or when they miss home.
The beauty of the self-soothe box is that it teaches children to recognize when they need support and gives them concrete tools to manage their feelings.
The Science Behind It All
Research backs up what many parents and teachers already know: play works.
A 2025 study on preschool-aged children found that play-based methods are the most effective approach to fostering emotional intelligence. Through role-playing and story-based games, children simulate real-life situations, experience both positive and negative emotions, and learn to understand others’ emotional states .
Activities like “The Theater of Emotions,” “The Dream of Colors,” and “I Understand My Friend” cultivate empathy, cooperation, tolerance, and positive communication .
Another 2025 study validated the importance of playful learning in promoting emotional development. Researchers found meaningful gains in empathy and self-control among students who participated in structured playful activities over 12 weeks .
The lesson is clear: children learn about emotions through experience, not explanation. Play is how they get that experience.
What I’d Tell a Fellow Parent
If you want to raise emotionally intelligent kids, here’s the most important thing I’ve learned: you need to get comfortable talking about feelings. Your own feelings. Your child’s feelings. The feelings of characters in books and movies. All of it.
Here’s what I’d say:
“Don’t wait for big emotional moments to talk about feelings. Make it part of everyday life. When you’re reading a book, ask how the character might be feeling. When you’re watching a movie, talk about the emotions on screen. When you’re having a tough day, name your own feelings so your child learns it’s okay to talk about them.
But here’s the key: when your child is in the middle of a meltdown, that’s not the time to teach. That’s the time to connect. Get down on their level. Acknowledge how they’re feeling. Then, when they’re calm, you can play through the situation and help them understand what happened.
And please, give yourself grace. You’re not going to get it right every time. I certainly don’t. What matters is that you’re trying—and that you’re showing your child that feelings are a normal part of being human.
At the end of the day, the most powerful tool you have is your own example. Your child is watching how you handle your emotions. Show them that it’s okay to feel big things and that there are healthy ways to work through them.“
Final Verdict
Teaching kids about emotions through play isn’t complicated. It doesn’t require expensive toys or elaborate lesson plans. What it requires is intention—the willingness to talk about feelings, to make space for emotional exploration, and to let your child lead the way.
I started this journey feeling like I was failing at emotional education. I finished it realizing that the most important thing I could do was simply be present, be curious, and be willing to play.
If you take one thing away from this article, let it be this: your child doesn’t need you to have all the answers. They just need you to be with them in their feelings. And sometimes, the best way to do that is through play.
Disclaimer: This article is based on my personal experience, research, and conversations with educators and child development specialists. It is not a substitute for professional mental health advice. If you have concerns about your child’s emotional development, consult with a qualified professional.

Baby’s First Year: My Honest Month-by-Month Reflections
Baby’s First Year :Let me start with something I don’t usually say at the beginning of a review: I’m exhausted.
Not because I’m writing this at 3 AM. But because I’ve been up with a baby who decided sleep was optional tonight. And honestly? That’s exactly why I wanted to write this.
When my first child was born, I was lost. I had read the books, scrolled through the forums, and asked every parent I knew for advice. But nothing—and I mean nothing—truly prepared me for the whirlwind of the first year.
I spent months documenting every milestone, every sleepless night, every moment of pure, heart-melting joy. What I found surprised me. The first year isn’t just about your baby’s development. It’s about yours too.
Let me walk you through what I discovered—month by messy, beautiful month.
Why I Started Paying Attention to the First Year
I’ll be honest. Before having kids, I thought I understood what the first year was about. Feed, sleep, change diapers, repeat. How hard could it be?
Then I brought my daughter home from the hospital.
The first night, I sat in the nursery at 2 AM, holding a crying baby, wondering if I was doing everything wrong. The books said she should sleep. She wasn’t sleeping. The books said she should feed every three hours. She wanted to feed every 45 minutes. Nothing was going according to plan.
That’s when I realized something important. The first year isn’t a checklist to complete. It’s a journey to experience. Every baby is different. Every family is different. And that’s okay.
The most important thing isn’t hitting every milestone exactly on schedule. It’s being present. Being patient. And giving yourself grace when things don’t go perfectly.
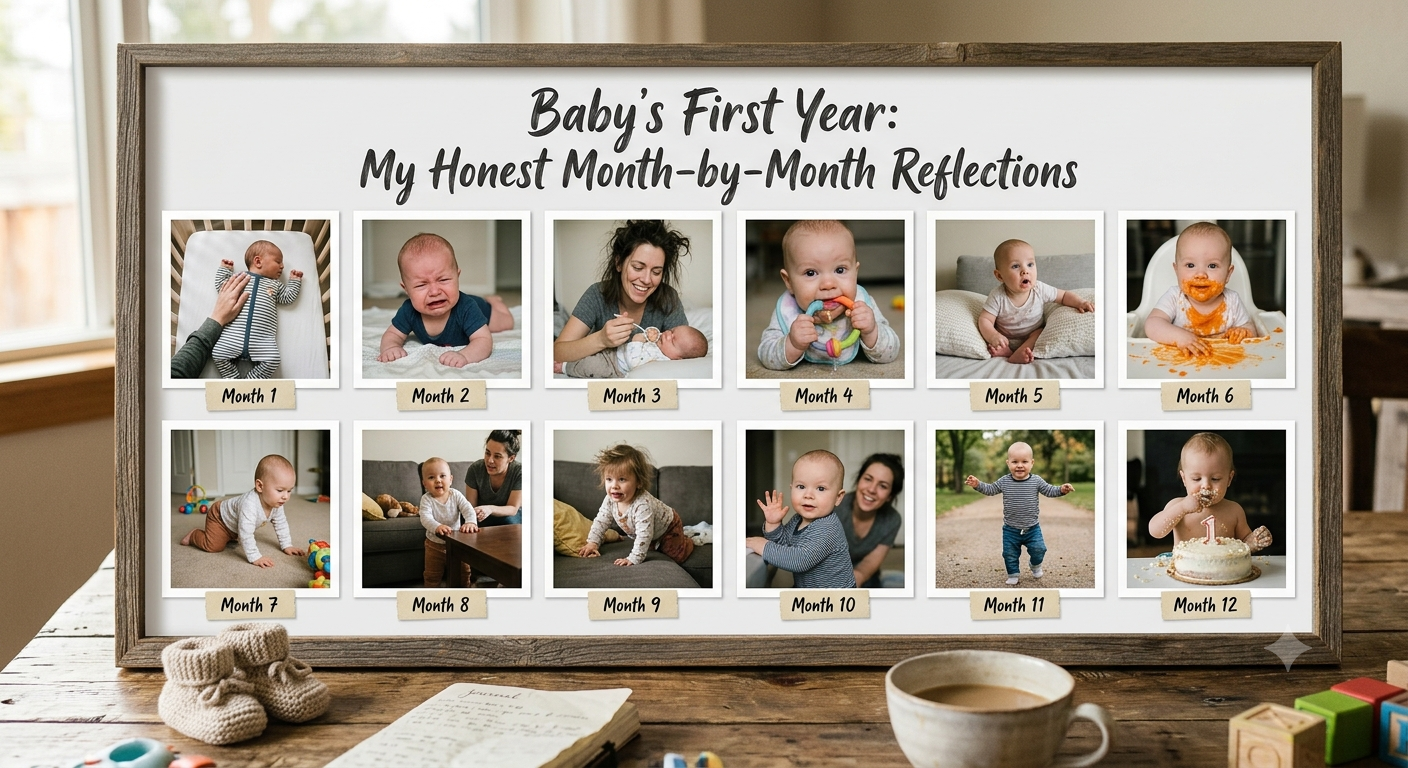
Month 1: The Newborn Phase
“I loved the very first sigh. It was like she knew she was safe in my arms.” – Kurin Riopel
The first month is about survival. For you and your baby. Those first weeks are a blur of feedings, diaper changes, and sleep deprivation that defies explanation.
Your baby is adjusting to life outside the womb . They’re born with powerful survival skills: the rooting and sucking reflex, the ability to turn their head away from an object blocking their airways, a fascination with faces (despite blurry vision) that helps cement the bond with you, and a powerful, galvanizing cry .
At this stage, most babies sleep the majority of the time . They’ll be awake for short periods to feed, and they’ll cry to communicate their needs—hunger, discomfort, or simply wanting to be held.
What I Learned:
My daughter spent most of her first month curled up in a tight ball, recreating her position in the womb. I remember being concerned that she never seemed to stretch out. But it turns out, the close confinement of the last month of pregnancy tightens their ligaments, so lying stretched out doesn’t come easily at first .
The first month is also about you adjusting. Your home, your schedule, your entire life revolves around this tiny person. And that’s okay. Give yourself permission to do nothing but care for your baby and yourself.
Tips from Experience:
- Trust your instincts. You and your baby are learning together.
- Accept help. When someone offers to bring food or hold the baby so you can shower, say yes.
- Take photos. You’ll want to remember those tiny fingers and toes.
- Sleep when the baby sleeps (yes, it’s cliché, but it works).
Month 2: The First Smile
“My eldest was a very solemn baby and broke into her first smile on my first Mother’s Day at exactly two months old.” – Tracy Chappell
Month two is when things start to get interesting. Your baby is more alert, more aware of the world around them. And the crying peaks around six to eight weeks .
But here’s the magic: sometime around now, you’ll see their first real smile. Not the fleeting, accidental smile of a newborn, but a beaming smile of pure pleasure . It changes everything.
Your baby is also starting to make their first vowel sounds and cooing, which is an exciting milestone in language development .
What I Learned:
The first time my daughter smiled at me, I cried. I had been exhausted, overwhelmed, and wondering if I was doing anything right. That smile told me everything I needed to know. She knew me. She was happy to see me. I was her person.
Tips from Experience:
- Talk to your baby constantly. They love hearing your voice.
- Try babywearing. It can provide comfort and reduce crying .
- Start reading to your baby. Choose books with bright pictures .
Month 3: Laughter and Interaction
“Her first laugh was at some silly sounds my husband would make. There is no better sound than her laugh.” – Andrée Raymond
By three months, your baby is already so different from their newborn self . Their body has relaxed, their hands have opened, and they’re starting to reach for toys .
This is also the month when you might hear their first laugh. And I can tell you from experience, there’s truly no better sound .
Your baby is also getting better at tummy time, lifting their head and chest . They’re becoming more interactive, responding to your voice and face with smiles and coos .
What I Learned:
I spent hours making silly faces and sounds to get my daughter to laugh. It became my mission. And when that first laugh came, it was like music. I recorded it on my phone and played it on repeat for weeks.
Tips from Experience:
- Introduce colorful toys to encourage visual tracking .
- Make faces and sounds to encourage interaction.
- Continue tummy time to build neck and upper body strength.
- Don’t be afraid of making a fool of yourself. Your baby loves it.
Month 4: The Golden Age
Month four is often called one of babyhood’s “golden ages” . Most four-month-olds are passionately in love with you but not yet standoffish with strangers, eager to explore the world but not yet mobile enough to “get into everything.”
Your baby is developing a sense of their own body. They’ll start looking at their hands, almost as if they’re thinking, “Where did this thing come from?” . And once they discover their hands, they’ll bring them to their mouth and start exploring everything with their tongue .
What I Learned:
The fourth month was when I really started to see my daughter’s personality emerge. She was curious, determined, and had a strong sense of humor. She also started giggling and squealing, which was absolutely delightful.
Tips from Experience:
- Talk to your baby constantly. They love hearing your voice .
- Introduce safe toys for them to grasp and explore.
- Respond to their sounds and giggles. You’re teaching them that communication works.
- Take lots of videos. The sounds they make at this age are precious.
Month 5: Reaching and Rolling
“At five months, my daughter started to roll over. My eyes were full of tears—I was such a proud mommy.” – Sara Stewart
By five months, your baby can reach out and grab something with one hand, with pretty good aim. With plenty of tummy time, they can probably do a baby “pushup,” holding the front half of their body off the ground .
Your baby has also likely doubled their birth weight by now . They’re starting to communicate desires through body language, like reaching for things or grasping at you because they want to be picked up .
What I Learned:
The first time my daughter rolled over, I was in the other room. My husband called out, “Did you see that?” I ran in, and of course, she was lying on her back, looking innocent. But I was so proud. And I also realized: time to babyproof.
Tips from Experience:
- Babyproof your home. Your baby is about to become mobile .
- Introduce teething rings. This is when teething often starts .
- Play games like peek-a-boo to develop object permanence.
Month 6: Solid Foods and Mobility
“When I go in after nap time, my son goes up on his hands and knees, and looks at me with the biggest smile on his face. It melts my heart every time.” – Allison Sewell
Six months is a huge milestone month. Your baby is likely ready to start solid foods. They’re watching your food intently as it moves from plate to mouth, even smacking their lips in imitation .
They’re also pushing their bodies up into a crawling position and may be crying out for attention when you leave the room . Once they learn to pull their knees under their body, mobility has arrived .
What I Learned:
Introducing solids was both exciting and terrifying. The first spoonful of pureed sweet potato ended up everywhere except in my daughter’s mouth. But she loved it. The mess was worth it to see her excitement.
I also realized that once she could move, nothing was safe. The days of leaving her on a blanket while I grabbed something from the kitchen were over.
Tips from Experience:
- Start with single-ingredient purees .
- Be patient. It takes time for babies to learn to eat.
- Continue tummy time and encourage movement.
- This is the time to really babyproof. They’re about to get fast.
Month 7: Teeth and Sitting
By seven months, it’s likely that your baby’s first tooth has appeared . Teething can be an uncomfortable period, with babies looking for objects to chew to alleviate the pain.
Most seven-month-old babies can now sit unsupported and will crawl or shuffle when placed on the floor . They can transfer objects from one hand to the other, and they know their own name and look up when you call them .
What I Learned:
Teething was rough. My daughter was cranky, drooling constantly, and chewing on everything in sight. Frozen teething rings became our best friend. But through it all, she was still curious and determined, practicing sitting and figuring out how to move.
Tips from Experience:
- Offer teething rings, especially cold ones .
- Create a safe area for your baby to explore.
- Talk to your baby using their name. They’ll respond.
- Celebrate every milestone, no matter how small.
Month 8: Separation Anxiety
“He had a real determination about him. When he wanted to crawl, he started that rocking back and forth and then took off.” – Kathleen Finlay
Two key things have happened by eight months: your baby can now get themselves where they want to go, and they’ve grasped the concept of object permanence . They realize that when you disappear from sight, you’re still somewhere.
But here’s the rub: separation anxiety . It can be stifling, but it just means your baby really, really loves you. In time, they’ll learn that you always come back and saying goodbye will be easier .
Your baby is also likely crawling by now, grasping things with their thumb and first two fingers, and responding to “No” by pausing or stopping their activity .
What I Learned:
The separation anxiety hit hard. My daughter would cry when I left the room, and I felt guilty every time I needed to step away. But I realized this was normal—a sign of secure attachment. She knew I was her safe person.
Tips from Experience:
- Develop goodbye rituals .
- Play peek-a-boo to reinforce that you always come back.
- Encourage independent play with safe toys.
- Be patient. This phase passes.
Month 9: Pulling Up and Pincer Grasp
Nine-month-old babies can grasp foods and are working hard on developing the coordination to feed themselves . They may be pulling themselves into an upright position and may also be taking supported steps .
They can understand simple instructions and are likely to understand their own names . They also develop the “pincer grip,” picking up tiny objects between thumb and forefinger .
What I Learned:
The pincer grip was both impressive and terrifying. My daughter could pick up individual pieces of food—and then everything else she found on the floor. Babyproofing went to a whole new level.
Tips from Experience:
- Create a safe area for practicing standing and cruising.
- Provide blocks for stacking and toys for grasping .
- Offer finger foods to practice self-feeding.
- Watch for dropped objects—they’ll now be throwing things on purpose .
Month 10: Cruising and Communication
At ten months, your baby is quickly gaining confidence. Even though they might not be able to walk, if they’ve started crawling, they can move quite rapidly and may even try to climb stairs .
They can communicate back to you using signs or body language, and it’s exciting to watch them process your words . They’re also starting to understand that things exist even when they’re out of sight .
What I Learned:
This was the month my daughter became a copy-cat. I’d tap the table, and she’d tap it too. I’d make a funny face, and she’d try to copy me . It was amazing to see her learning through imitation.
Tips from Experience:
- Encourage cruising by placing toys just out of reach.
- Play interactive games like peek-a-boo.
- Copy their sounds and actions. It’s how they learn.
- Be patient if they’re not walking yet. Every baby develops at their own pace.
Month 11: On the Verge
On the verge of walking, on the verge of talking, on the verge of eating “big people” food—the world is opening up for the nearly one-year-old .
Your baby may already say “Mama,” “Dada,” or a sibling’s name. They’ve probably made the fascinating discovery that small things can fit inside bigger things: filling, dumping, and pouring will be a favorite activity for months to come .
What I Learned:
The house became a constant mess. Toys were everywhere—dumped out of baskets, thrown across the room, and scattered in every corner. But I learned to embrace the chaos. It was a sign of exploration and discovery.
Tips from Experience:
- Provide stacking toys, nesting rings, or cups .
- Encourage exploration in a safe environment.
- Celebrate every new word, even if it’s just a sound.
- Start preparing for the big birthday.
Month 12: Happy Birthday
“For my first son I made this elaborate birthday cake. But with Matias, we just had carrot cupcakes and left it at that. He loved it!” – Kathleen Finlay
In 12 short months, a tiny, helpless newborn has transformed into this busy, bright toddler . Look at all they can do: pull themselves to a stand, crawl up stairs, feed themselves, stack and throw toys, imitate sounds and gestures, understand several words, and maybe say a couple .
They’ve come a long way. And just wait till you see what they get up to next year .
What I Learned:
My daughter’s first birthday was emotional. I couldn’t believe how much she’d grown and changed in just one year. And I couldn’t believe how much I’d grown too. I was a different person—more patient, more loving, more tired, but so much more fulfilled.
Tips from Experience:
- Celebrate the milestone with cake (and let them make a mess).
- Take comparison photos with the same background as the newborn photos .
- Reflect on your journey. You’ve both come so far.
- Start looking forward to year two—it’s going to be even more exciting.
Key Milestones Overview
For quick reference, here are the key milestones I observed:
Common Concerns and When to Seek Help
It’s normal to worry. Here are some signs that may warrant a conversation with your pediatrician :
- Baby is not responding to sounds or visual stimuli in the first month
- Baby is not sitting or crawling by 10 months
- Limited social interaction such as lack of smiling or eye contact at any milestone
Trust your instincts. If something feels off, talk to your doctor. Early intervention can make a significant difference .
My Honest Advice for New Parents
Here’s what I wish I’d known going into the first year:
1. Every Baby Is Different
The milestones in this article are averages. Your baby will hit some early and others late. That’s normal. The important thing is progress over time, not perfection .
2. You Can’t “Do It Wrong”
Parenting is not a test. There’s no right way to do it. Trust your instincts, listen to your baby, and give yourself grace when things don’t go perfectly.
3. The Hard Phases Are Temporary
The sleepless nights, the teething, the separation anxiety—they all pass. Sometimes it feels like they’ll never end, but they do.
4. Document Everything
Take photos, take videos, write down the moments you want to remember . The first year goes faster than you can possibly imagine.
5. Take Care of Yourself
You can’t pour from an empty cup. Rest when you can, accept help when it’s offered, and give yourself permission to do less.
6. It Gets Easier
Not in the sense that parenting ever becomes easy. But you become more confident. You learn your baby. You figure out what works for your family.
Final Verdict
The first year is a whirlwind. It’s exhausting, emotional, and sometimes overwhelming. But it’s also beautiful, joyful, and transformative.
In 12 months, your tiny, helpless newborn transforms into a busy, curious toddler with opinions, humor, and willpower. And you transform too—into a parent who knows their baby better than anyone else in the world.
If you’re in the middle of the first year right now, take a deep breath. You’re doing better than you think. Enjoy the small moments—the first smile, the first laugh, the first steps. They’ll be gone before you know it.
And remember: your baby doesn’t care if you’re perfect. They just care that you’re there.
Disclaimer: This article is based on my personal experience and research. It is not a substitute for professional medical advice. Always consult your pediatrician with any concerns about your baby’s development. Every baby is unique and reaches milestones at their own pace.
10 Superfoods That Naturally Boost Your Child’s Immune System
Superfoods That Naturally Boost Your Child’s Immune System :As a parent, you know the drill: your child starts a new school year, and within weeks, the sniffles, coughs, and colds begin. Children are naturally curious and active, often exposing themselves to germs and infections. While handwashing and sleep routines are crucial, what your child eats plays a significant role in building a strong immune system. Research shows that a balanced, nutrient-rich diet can help kids fight off infections and recover faster.
The good news? You don’t need expensive supplements or exotic ingredients. Most immune-boosting “superfoods” are everyday whole foods like berries, beans, and greens. Here are 10 science-backed superfoods to add to your child’s plate.
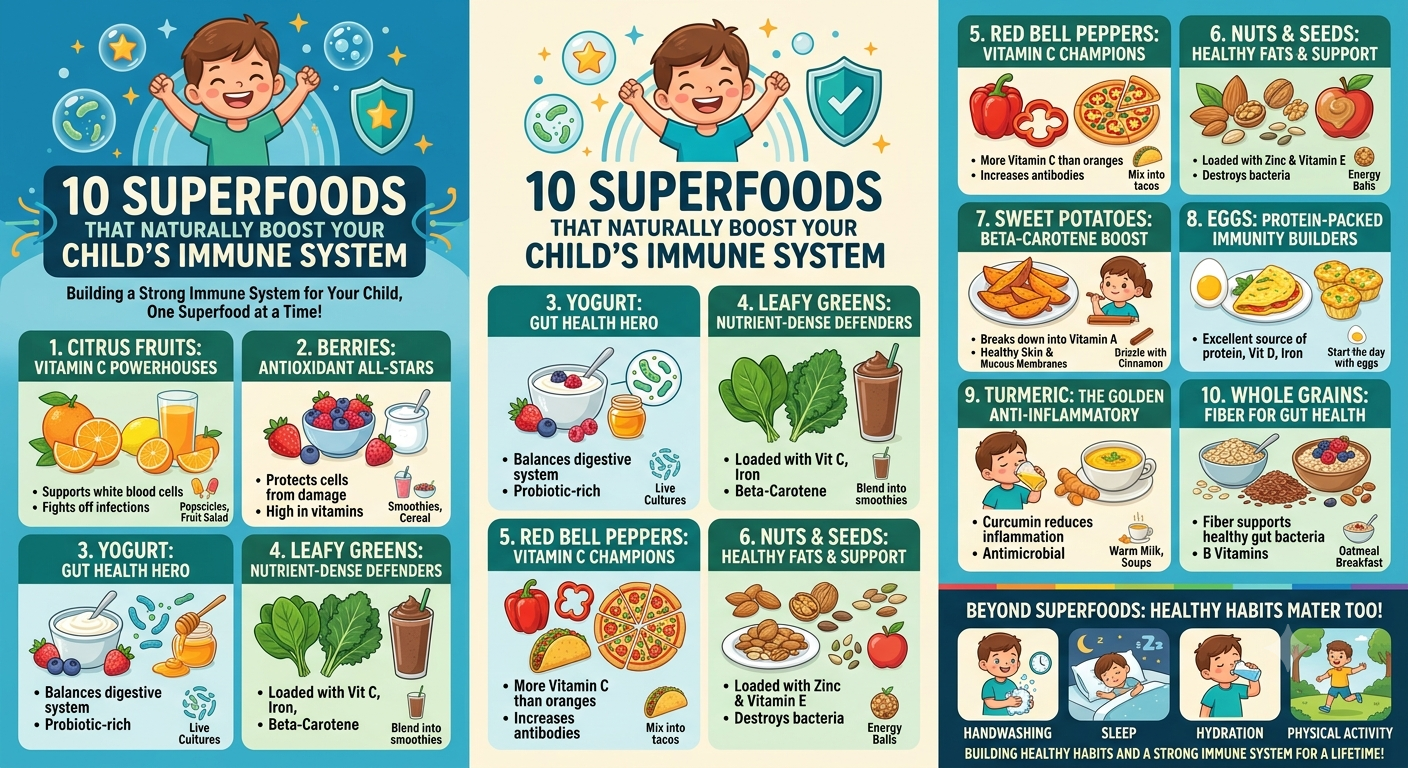
1. Citrus Fruits: Vitamin C Powerhouses
Oranges, grapefruits, lemons, and tangerines are packed with vitamin C, which supports white blood cell function and helps the body fight off infections. A glass of fresh orange juice in the morning or adding lemon to water can do wonders.
Pro tip: For fussy eaters, make popsicles with fresh citrus juice or create a colorful fruit salad with a variety of citrus fruits.
2. Berries: Antioxidant All-Stars
Strawberries, blueberries, and raspberries are rich in antioxidants and vitamins that protect cells from damage and support immune function. They are perfect for snacks, added to yogurt, cereal, or blended into smoothies.
Pro tip: Frozen berries are just as nutritious as fresh ones—keep a bag in the freezer for quick smoothies.
3. Yogurt: Gut Health Hero
A strong immune system begins in the gut. Probiotic-rich yogurt with live cultures contains good bacteria that help balance the digestive system, reduce inflammation, and boost resistance to infections—especially respiratory ones.
Pro tip: Choose plain, unsweetened yogurt and serve it with fresh fruits, a drizzle of honey, or blend it into smoothies.
4. Leafy Greens: Nutrient-Dense Defenders
Spinach, kale, and other dark leafy greens are loaded with vitamin C, vitamin K, iron, folate, and beta-carotene. These nutrients support immune cell production and help fight off infections. Kale is especially high in beta-carotene, which the body converts into vitamin A to fuel the immune system.
Pro tip: Blend spinach or kale into a chocolate smoothie with berries and nut butter. If it looks like a chocolate treat, most kids will drink it without even knowing the greens are in there.
5. Red Bell Peppers: Vitamin C Champions
Red bell peppers actually contain more vitamin C than oranges. They help increase the body’s supply of white blood cells and antibodies. Plus, their bright color and crunchy texture make them appealing to kids.
Pro tip: Chop peppers into tiny pieces and mix them into taco meat, or sauté and serve as a colorful topping on pizza or pasta.
6. Nuts and Seeds: Healthy Fats and Immune Support
Almonds, walnuts, sunflower seeds, flax, chia, and pumpkin seeds are loaded with zinc, vitamin E, and omega-3 fatty acids. Vitamin E enhances antibody-producing immune cells and helps destroy harmful bacteria. Zinc is essential for immune cell growth and function.
Pro tip: Offer them as trail mixes, homemade energy balls, or add them to cereals, yogurts, and smoothies. Blend nut or seed butter into smoothies or serve as a dip with sliced apples or bananas.
7. Sweet Potatoes: Beta-Carotene Boost
Sweet potatoes are packed with beta-carotene, a plant-based compound that breaks down into vitamin A in the body. Vitamin A is essential for healthy skin and mucous membranes—the body’s first line of defense against pathogens.
Pro tip: Roast sweet potato wedges with a drizzle of olive oil and a sprinkle of cinnamon for a naturally sweet, kid-friendly side dish.
8. Eggs: Protein-Packed Immunity Builders
Eggs are an excellent source of protein, iron, selenium, and vitamin D—all important for immune function. Protein is needed to make immune cells and antibodies.
Pro tip: A boiled egg or an omelette in the morning gives kids a great head start to the day. Egg muffins with vegetables are also a great make-ahead option.
9. Turmeric: The Golden Anti-Inflammatory
Turmeric contains curcumin, a compound with powerful anti-inflammatory and antimicrobial properties. A pinch of turmeric in warm milk is a time-tested remedy in many households.
Pro tip: Sneak turmeric into soups, stews, or pair it with sweeter flavors like sweet potato to make the warm, slightly bitter taste more palatable for kids.
10. Whole Grains: Fiber for Gut Health
Whole grains like oats, brown rice, millet, and whole wheat are rich in fiber, B vitamins, and essential minerals. These foods support the development of healthy gut bacteria, which in turn help regulate the immune response.
Pro tip: Start the day with a bowl of oatmeal topped with berries and a sprinkle of nuts for a fiber-rich, immune-boosting breakfast.
Beyond Superfoods: Healthy Habits Matter Too
While these superfoods are powerful tools, immune health is also about what we do daily:
- Handwashing: Teach kids to wash with soap for 20 seconds before eating, after using the bathroom, and after recess.
- Sleep: School-aged kids need 9–12 hours of sleep per night. Sleep deprivation weakens the immune system.
- Hydration: Water supports every system in the body, including immunity. Encourage sips throughout the day.
- Physical Activity: Exercise improves circulation and helps immune cells move efficiently.
Final Thoughts
Encouraging a varied diet rich in these immunity-boosting foods can help protect your child from frequent illnesses and support their overall development. The key is to make these foods fun, accessible, and part of your family’s routine. Get your kids involved—let them pick fruits and veggies at the store, help season food, and even plate their own meals. It makes them more likely to try new things.
By weaving immune-supporting foods and habits into your family’s daily life, you’re not just preparing for cold and flu season—you’re setting your child up for a lifetime of better health.
Read also
Things I Wish I Knew Before Having Kids (Honest Advice From a Real Mom)
How to Potty Train Your Toddler in 3 Days (Without the Stress)
How to Potty Train Your Toddler in 3 Days :Potty training. Just the words can make any parent break into a cold sweat. The fear of accidents, the endless trips to the bathroom, the stubborn resistance—it’s enough to make you want to keep buying diapers forever.
But here’s the thing: it doesn’t have to be that way.
Potty training can be a smooth, even enjoyable, experience for both you and your toddler. And yes, you can do it in just three days.
This guide will walk you through a proven, stress-free method that has worked for thousands of parents. No fear. No stress. Just results.
Why the 3-Day Method Works
The 3-day potty training method is based on a simple principle: eliminate the distractions.
When you commit to three focused days, you send a clear message to your toddler: “This is important, and we’re doing this together.” It removes the confusion of on-and-off training and gives your child the consistency they need to learn.
According to child development experts, most toddlers are ready for potty training between 18 and 36 months. The key is recognizing the signs of readiness and then committing fully to the process.
Step 1: Know If Your Toddler Is Ready
Before you start, make sure your child is actually ready. Pushing a child who isn’t ready will only lead to frustration for both of you.
Signs of Readiness
Your toddler may be ready if they:
- Stay dry for at least two hours at a time
- Tell you when they are wet or have pooped
- Show interest in the potty or in wearing underwear
- Can follow simple instructions
- Dislike being in a dirty diaper
- Can pull their pants up and down
The most important thing to remember: Every child is different. Some are ready at 18 months, others at 3 years. There is no “right” age.
Step 2: Prepare for the Big Day
Preparation is the secret to success. Don’t just dive in—take the time to set yourself up for a smooth experience.
What You’ll Need
Before you start, gather these supplies:
- 10-15 pairs of training pants or underwear – You will go through a lot of them
- A potty chair or potty seat – Let your child pick one out if possible
- Easy-to-remove clothing – Avoid overalls, onesies, or anything with complicated buttons
- Rewards – Stickers, small toys, or a special treat for successes
- A timer – For regular potty breaks
- Books or toys – To keep your child occupied while sitting on the potty
- Patience – Lots and lots of patience
Set Your Expectations
This is important: accidents will happen. They are part of the process, not a sign of failure. Plan for them, accept them, and move on without making your child feel bad.
Step 3: The 3-Day Plan
Here is a day-by-day breakdown of the three-day potty training method.
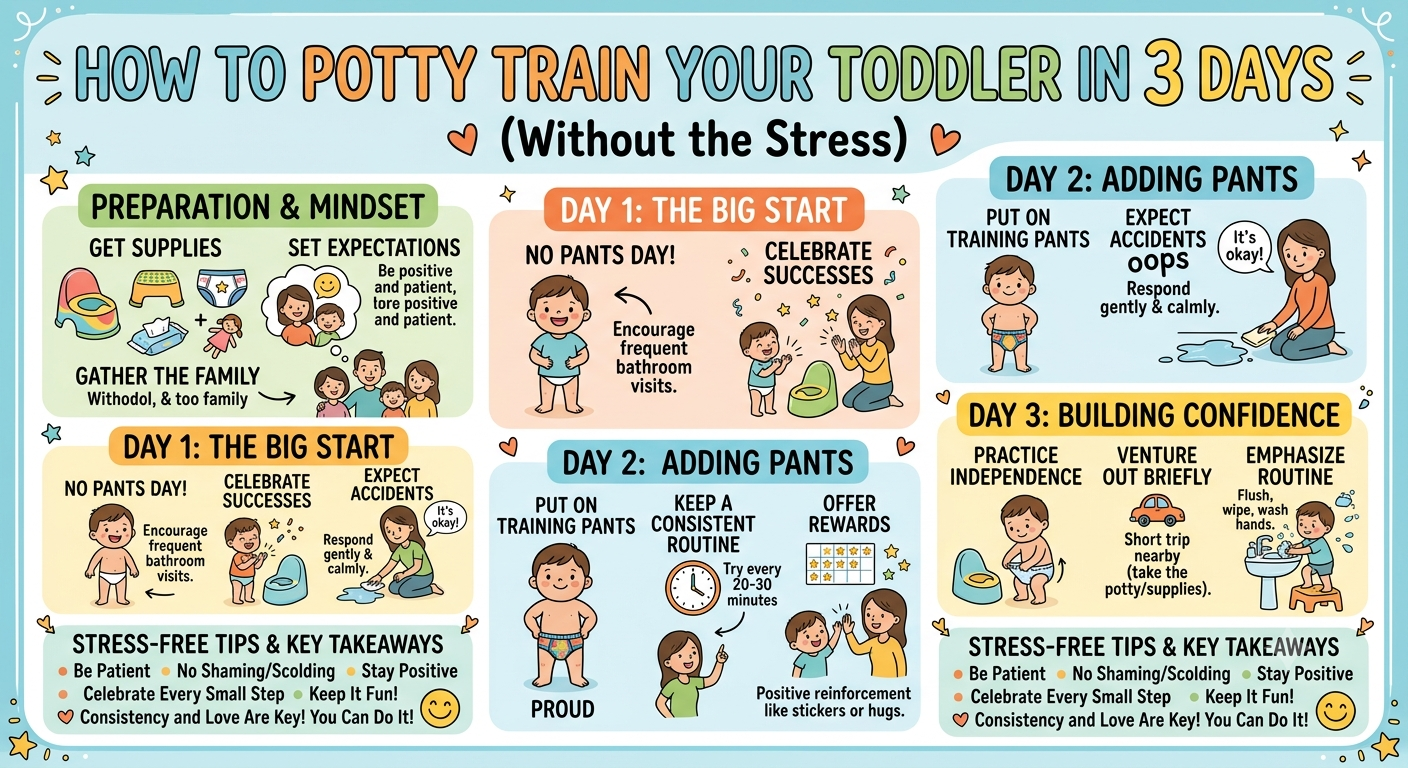
Day 1: The Naked Day
The goal: Help your child make the connection between the feeling of needing to go and actually going.
- Start the day by removing diapers. Let your child go without pants or underwear for the entire day. This helps them become more aware of their body’s signals.
- Watch your child closely. You will quickly start to notice the signs that they need to go—squirming, holding themselves, a sudden pause in play.
- Say the magic words: “Let’s go try the potty!” Say this every time you see a signal. If they have an accident, say, “Oops, pee goes in the potty. Let’s try sitting on the potty next time.”
- Take them to the potty regularly. Set a timer for every 15-20 minutes and have them sit on the potty for a few minutes, even if they don’t go.
- Celebrate successes. When they do go in the potty, make a big deal out of it. Clap, cheer, give a sticker. This positive reinforcement is crucial.
- Stay calm during accidents. If they have an accident (and they will), calmly clean it up without making your child feel ashamed. Say something like, “It’s okay, you’re still learning. Next time we’ll try to get to the potty.”
Day 2: The Underwear Day
The goal: Help your child learn to stay dry while wearing underwear.
- Continue the routine. Keep the potty schedule from Day 1, but now have your child wear underwear or training pants.
- Remind them often. “Remember, you’re wearing big-kid underwear now. If you feel the need to go, run to the potty!”
- Continue with the timer. Keep the 15-20 minute potty schedule for the first half of the day. By the second half, you can start gradually increasing the time.
- Celebrate dry underwear. If you notice that your child has stayed dry for a while, praise them. “Wow, look at you! You’re keeping your underwear so dry!”
- Handle accidents with grace. Accidents will still happen. Follow the same calm approach as Day 1. Do not show frustration or anger—this can create anxiety around potty training.
Day 3: The Independence Day
The goal: Help your child start recognizing the need to go on their own.
- Let your child take the lead. Now that they have two days of experience, start stepping back. Let them tell you when they need to go.
- Continue with prompts, but not over-prompts. Don’t stop reminding them, but don’t ask every five minutes. Try saying, “I’m going to potty now. Do you need to go?”
- Be ready for a potential regression. It is very common for toddlers to have a small regression on this day. They may have more accidents. This is not a failure—it’s part of the learning process.
- Keep celebrating successes. Continue with the stickers, cheers, and rewards.
What to Do After the 3 Days
The 3-day method is just the beginning. Your child will still need reminders and support for weeks or even months after. Here’s how to handle the transition:
Going Out
- Take a portable potty or potty seat with you
- Use bathroom breaks strategically – Before you leave, upon arrival, and before you head home
- Bring a change of clothes – Just in case
Nighttime Training
Nighttime training usually takes longer than daytime training. Most children become dry at night between the ages of 3 and 5. Be patient and keep using training pants at night until your child consistently wakes up dry.
Regression
If your child has a regression—more accidents after being successful—don’t panic. This is normal and often triggered by stress, a change in routine, or a new sibling. Go back to the basics, and stay calm.
Common Potty Training Myths (Debunked)
Myth 1: You Can Potty Train in One Day
While some children can learn quickly, the 3-day method is the most realistic timeline for complete training. Some children will need more time.
Myth 2: Boys Are Harder to Train
This is a common myth with little evidence to back it up. The biggest difference is often that boys are ready slightly later than girls. Patience and consistency are key for both.
Myth 3: You Should Wait Until Your Child is Completely Ready
It is generally best to start when your child shows signs of readiness. If you wait until they are 100% ready, you could be waiting a very long time. A gentle push in the right direction can help them learn.
Myth 4: Punishment Speeds Up the Process
This is completely false. Punishment will only make your child fearful and create a negative association with the potty. Positive reinforcement is the most effective approach.
Myth 5: Potty Training is Always Stressful
It doesn’t have to be. By following a proven method, staying calm, and maintaining realistic expectations, you can transform potty training from a stressful experience into a successful milestone.
Tips for a Stress-Free Experience
1. Stay Positive
Your attitude sets the tone. If you are stressed, your child will be stressed. Stay relaxed, encouraging, and positive.
2. Make It Fun
Let your child pick out their own underwear, read potty books together, and sing songs while they sit on the potty. The more fun it is, the less resistance you’ll face.
3. Use Their Favorite Activity
If your child loves a certain toy or book, make it a “potty-only” activity. This gives them a strong incentive to sit on the potty.
4. Let Them See You
Toddlers learn by watching. Let them see you or an older sibling use the toilet. This normalizes the process and helps them understand what is expected.
5. Don’t Compare
Every child learns at their own pace. Avoid comparing your child to siblings, friends, or neighborhood children.
6. Trust the Process
Some days will be better than others. Stay consistent with the method and trust that your child will get there.
What to Avoid During Potty Training
1. Avoid Punishment
As mentioned, punishment can create fear and anxiety. It does not help your child learn faster.
2. Avoid Pressure
Forcing your child to sit on the potty for extended periods or demanding they use it before they are ready creates resistance and stress.
3. Avoid Starting During a Stressful Time
Don’t start training during a major life event such as a move, a new baby, or starting daycare. Your child’s nervous system will be heightened, and they will be less willing to learn something new.
4. Avoid Pull-Ups During the Day
Pull-ups feel too much like diapers. Using them during the day can confuse your child. Reserve pull-ups for nighttime, if needed.
5. Avoid Negative Language
Instead of saying “You’re being a baby” or “This is disgusting,” use gentle, encouraging language.
When to See a Doctor
Most children learn to use the potty, but there are some cases where you should consult your doctor. Seek advice if:
- Your child is over 4 and hasn’t shown interest in potty training
- Your child is over 5 and is still having frequent accidents during the day
- Your child experiences severe pain while trying to poop
- Your child refuses to sit on the potty after several attempts
- Your child begins wetting themselves again after being successfully trained
A doctor can identify any underlying physical or emotional factors that may be affecting your child’s potty training progress.
Frequently Asked Questions
What is the 3-day potty training method?
The 3-day method is a focused approach where you dedicate three full days to potty training. Your child stays home, wears no diapers, and is taken to the potty regularly. The goal is to help them make the connection between the feeling of needing to go and actually using the potty.
Can I really potty train in 3 days?
Yes. Many parents have successfully used this method. However, every child is different. While most children learn the basics in three days, some may need more time for the skills to become fully established.
What if my child has an accident?
Accidents are a normal part of the learning process. Stay calm, clean it up, and reassure your child. Do not show frustration or anger.
What if my child fights me every time I try to put them on the potty?
If your child is fighting you, take a step back. You may be pushing too hard. Try making the potty more inviting with fun activities, and make it their choice to sit on the potty rather than a battle of wills.
When is the best time to start potty training?
The best time is when your child shows signs of readiness, which is usually between 18 and 36 months. Avoid starting during stressful times like a move, a new baby, or starting daycare.
Is it better to use a potty chair or a potty seat?
This depends on your child’s preference. A potty chair is portable and can be placed anywhere, making it easier for your child to access quickly. A potty seat on the regular toilet can help your child transition to the “big potty” sooner.
What should I do if my child has a regression?
Regression is common. It often occurs during stressful times or when there is a change in routine. Go back to basics, stay calm, and reinforce the positive behavior.
Final Thoughts
Potty training is a significant milestone, both for you and your child. It can feel overwhelming at first, but with the right approach, it can be a rewarding experience that brings you closer.
The 3-day method has worked for thousands of families—and it can work for yours too.
Remember these key points:
- Prepare properly – Have all your supplies ready before you start
- Stay consistent – Stick to the plan for the full three days
- Stay positive – Celebrate successes and treat accidents as learning moments
- Trust your child – They will get there in their own time
Read also
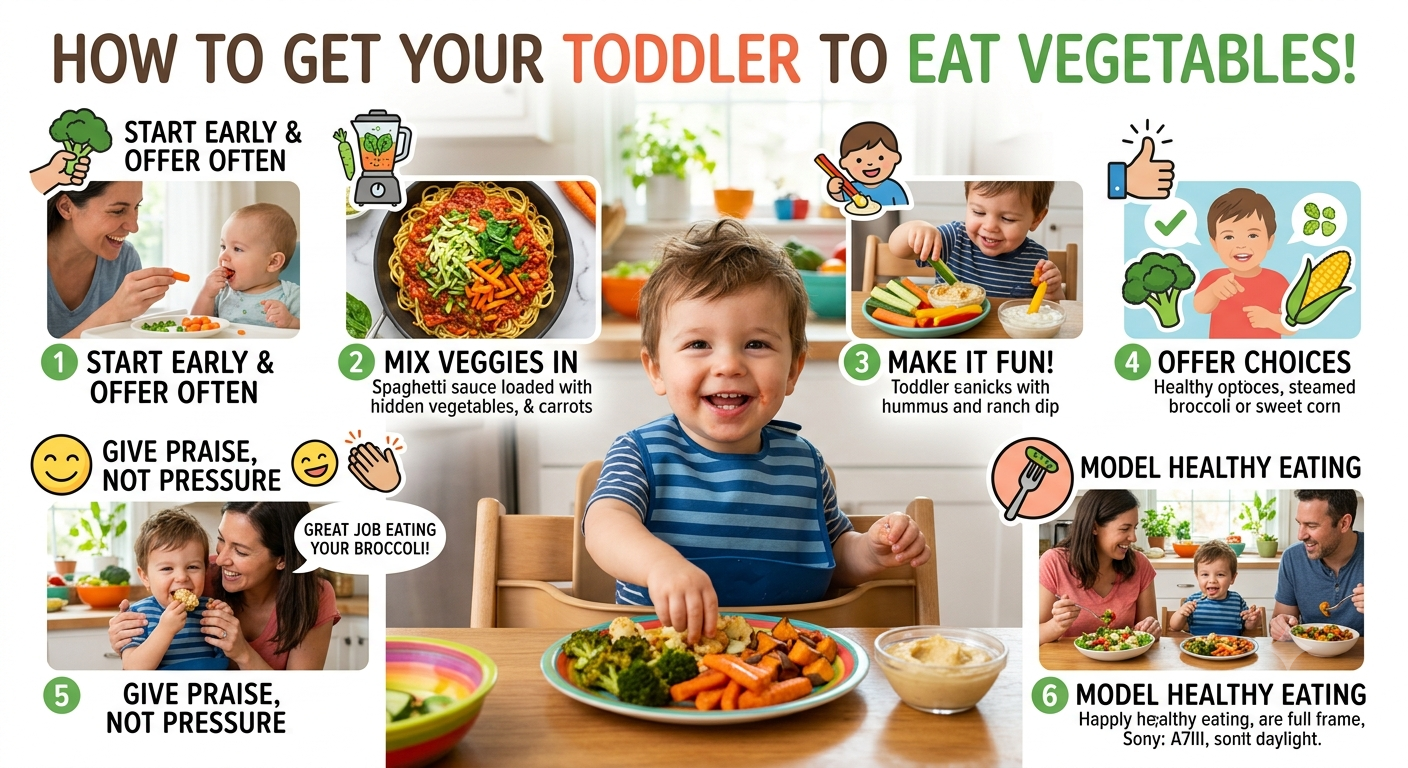
How to Get Your Toddler to Eat Vegetables (Without Bribery)
How to Get Your Toddler to Eat Vegetables :If you have a toddler, you have probably experienced it: the plate of carefully steamed broccoli pushed aside. The lovingly arranged carrot sticks left untouched. The peas that somehow ended up on the floor, not in the mouth.
Getting toddlers to eat vegetables can feel like an impossible battle. And the easiest solution—bribery—often backfires in the long run. It teaches children that vegetables are punishment, treats are rewards, and eating is a negotiation.
But there is a better way.
Here is how to encourage your toddler to eat vegetables without resorting to bribery, threats, or tears.
First, Understand the Toddler Mindset
Before you can win the vegetable battle, you need to understand what you are up against.
Toddlers Are Naturally Suspicious
Food neophobia—the fear of new foods—is a normal developmental stage in toddlers. Between the ages of 2 and 6, children naturally become more cautious about unfamiliar foods. This is not defiance. It is survival instinct. Your toddler is not trying to be difficult. Their brain is telling them, “I don’t know what that is. Is it safe?”
Toddlers Are Limited in What They Can Eat
A toddler’s stomach is about the size of their fist. They simply cannot eat large portions. This means every bite counts, and if they fill up on less nutritious foods, they will have less room for vegetables.
Toddlers Seek Control
Toddlers are discovering their independence. Refusing food is one of the few ways they can exert control over their lives. The more pressure you apply, the more they will resist.
Toddlers Are Sensitive to Taste and Texture
Children have more taste buds than adults, which means flavors can be overwhelming. Bitter flavors—common in many vegetables—are particularly unappealing to young taste buds.
The Long-Term Goal: Raise a Healthy Eater
Before we get into specific strategies, it helps to clarify the ultimate goal. Your goal is not to get your toddler to eat broccoli tonight. Your goal is to raise a healthy eater who eventually chooses vegetables willingly.
This shift in perspective changes everything. You are not fighting a daily battle. You are building a lifelong relationship with food.
Strategies That Actually Work (No Bribery Required)
1. Lead by Example
Children learn by watching. If you want your toddler to eat vegetables, they need to see you eating vegetables—and enjoying them.
This means:
- Eating vegetables at the same table
- Showing enthusiasm for the food on your own plate
- Not making faces when you eat something you do not love
- Eating together as a family whenever possible
Your toddler may not copy you immediately, but they are watching. Over time, they will become more curious about what is on your plate.
2. Start Early
The earlier you introduce vegetables, the more familiar they become. Babies who are introduced to a variety of vegetables during weaning are more likely to accept them as toddlers.
Even if you are past the weaning stage, it is never too late to start. Consistency matters more than timing.
3. Offer Vegetables First
Serve vegetables before anything else on the plate. When toddlers are hungriest, they are more willing to try new foods. The main course and carbs can wait until they have had a few bites of vegetables.
4. Make Vegetables Fun
Presentation matters. Try:
- Cutting vegetables into fun shapes with cookie cutters
- Arranging them into faces or patterns on the plate
- Serving them in colorful bowls
- Letting toddlers help arrange their own plates
- Serving veggies with a fun dip like hummus or yogurt-based dressing
5. Involve Your Toddler in Food Preparation
Toddlers are much more likely to eat something they helped make. Let them:
- Wash vegetables in the sink
- Stir a salad
- Snap green beans
- Sprinkle herbs or cheese on vegetables
- Pick vegetables at the grocery store or farmers market
The more ownership they feel over the food, the more likely they are to eat it.
6. Serve Vegetables in Different Ways
If your toddler rejects roasted broccoli, try steamed. If they reject steamed, try raw. If they reject raw, try pureed into a sauce. Experiment with different:
- Textures (crunchy, soft, smooth, chunky)
- Temperatures (warm, room temperature, cold)
- Flavors (plain, seasoned, sweetened, savory)
- Shapes (sticks, rounds, spirals, diced, pureed)
Some toddlers prefer vegetables cold. Some prefer them warm. Some prefer them crunchy. The only way to find out is to experiment.
7. Hide Vegetables (Strategically)
While the goal is for your toddler to accept vegetables openly, there is nothing wrong with sneaking extra vegetables into meals—especially during the toddler years when they are particularly resistant.
Try:
- Pureeing vegetables into sauces (tomato sauce, cheese sauce)
- Adding grated vegetables to meatballs, burgers, or meatloaf
- Blending vegetables into smoothies
- Adding finely chopped vegetables to scrambled eggs or omelets
- Using vegetable purees in baked goods like muffins or pancakes
8. Pair Vegetables with Foods They Already Like
Mixing new foods with familiar favorites can increase acceptance:
- Serve vegetables alongside a favorite dip
- Add vegetables to a familiar dish like pasta or soup
- Place vegetables next to a food they love
If a child sees a vegetable paired with a trusted food, they are more likely to trust it.
9. Use the “One Bite” Rule (Without Pressure)
The “one bite” rule can be effective, but the approach matters. Instead of demanding, “Eat your vegetables,” try:
- “Just lick it first to see if you like it.”
- “Just taste a tiny piece.”
- “Take one bite and if you really do not like it, that is okay.”
The key is to remove the pressure. They can try it and decide they do not like it. The goal is not to force them to eat the whole plate. It is simply to expose them to the taste.
10. Be Patient and Persistent
Research shows that it can take up to 15-20 exposures for a child to accept a new food. That is 15-20 separate opportunities to see, smell, touch, and taste a vegetable before they decide they like it.
This means you need to keep offering—without pressure—even when they reject it repeatedly. Every exposure is progress, even if it does not look like it.
11. Avoid the “Clean Plate” Rule
Forcing children to finish their vegetables can create negative associations and resistance. Instead, let them decide how much to eat. Trust their internal hunger cues.
12. Use the “Eat One, Leave One” Approach
Some parents have success with the “eat one, leave one” approach: “You do not have to eat all your broccoli. You just need to try one. Then you can leave the rest.” This removes the power struggle while still encouraging exposure.
13. Do Not Forget About Familiarity and Modeling
Some research suggests that children are more likely to eat vegetables when they see their peers or family members eating them. Eating together as a family and modeling positive eating behaviors can be one of the most effective strategies.
What Not to Do
1. Do Not Bribe
“Eat your broccoli and you can have dessert.” This teaches your child that broccoli is the price they pay for something good. It makes vegetables the enemy and dessert the reward.
2. Do Not Force
Force-feeding creates negative associations with food. It can also lead to power struggles that make eating a battle. When children feel pressured, they resist.
3. Do Not Make a Big Deal
If you act anxious or frustrated about vegetables, your toddler will notice. Toddlers are experts at reading their parents’ emotions. The more stressed you are, the more stressed they become.
4. Do Not Label Your Toddler as Picky
Labels can become self-fulfilling prophecies. If you tell your toddler they are picky, they may start to believe it. Use neutral language: “You are still learning to like vegetables.”
5. Do Not Give Up
It is easy to get discouraged when your toddler rejects vegetables repeatedly. But giving up only reinforces the idea that vegetables are not part of your family’s diet. Keep offering.
What If Your Toddler Refuses Vegetables?
First, take a breath. This is normal.
- Many toddlers go through phases of refusing vegetables. They are not being difficult. They are being developmentally appropriate.
- Try not to stress. Research from the University of Michigan School of Public Health found that 7 to 10 exposures to a vegetable can drastically increase a toddler’s willingness to try it. Keep offering.
- Focus on what they are eating, not what they are not. If they are getting some nutrients from other foods, that is okay. They will not have nutritional deficiencies from a few weeks of picky eating.
What to Do If Your Toddler Is Extremely Picky
Some toddlers are more resistant than others. If your toddler is extremely picky and the above strategies are not working, consider:
- Occupational therapy for sensory processing issues
- Feeding therapy with a specialist
- Working with a pediatric dietitian who can help with feeding challenges
These professionals can help identify the root cause of food refusal and develop targeted strategies.
Long-Term Perspective
Remember: childhood eating is not a snapshot. It is a long, winding path. The toddler who refuses vegetables today may grow into a teenager who eats a garden salad by choice.
In fact, studies show that when children are exposed to a wide variety of foods and are allowed to decide what to eat without pressure, they are more likely to develop a healthy relationship with food.
The goal is not perfection. The goal is progress.
Your toddler will not eat vegetables at every meal. They will have days when they eat nothing but crackers. They will go through phases where they reject previously loved foods. This is normal.
What matters is the long arc: a parent who offers vegetables consistently, without pressure, and trusts that their child is capable of learning to eat a variety of foods.
Quick Vegetable Tips for Busy Parents
- Freeze vegetables – Stock up on frozen veggies to have on hand for quick meals
- Batch cook – Roast a batch of vegetables at the start of the week to serve with multiple meals
- Use leftovers – Add leftover vegetables to soups, pasta, or omelets
- Buy pre-cut – Pre-cut vegetables can save time and make serving easier
- Keep it simple – Steamed or roasted vegetables with a drizzle of olive oil and a sprinkle of salt are delicious and easy
Final Thoughts
Getting toddlers to eat vegetables is not about winning a battle. It is about building a lifelong relationship with food. It is about helping children feel safe, curious, and empowered to try new things.
You are not failing if your toddler rejects a vegetable. You are succeeding every time you offer it again without pressure, without punishment, and without bribery.
Keep offering. Keep modeling. Keep trusting your child.
Over time, the pressure will ease, and they will learn to enjoy the vegetables you have been serving all along.
Frequently Asked Questions
What if my toddler simply refuses all vegetables?
This is normal. Many toddlers go through phases of refusing vegetables. Keep offering them without pressure, get creative with how you serve them, and remember that exposure matters more than consumption at this stage. They will not have nutritional deficiencies from a few weeks of picky eating.
How many times do I need to offer a vegetable before my toddler will eat it?
Research suggests it can take 10-15 exposures before a toddler accepts a new food. It can take up to 20 times for some children. Keep offering without pressure.
Is it okay to hide vegetables in food?
Yes. While the goal is for your toddler to eventually accept vegetables openly, hiding them in sauces, meatballs, smoothies, and baked goods is a valid strategy during the toddler years.
What if my toddler only wants to eat one or two foods?
This is common in toddlers. The best approach is to keep offering a variety of foods alongside their favorites, model healthy eating yourself, and avoid making mealtimes stressful.
Is it okay to bribe my child to eat vegetables?
Bribery teaches children that vegetables are the price they pay for something good. It can reinforce the idea that vegetables are not enjoyable. It is better to avoid bribery and focus on consistent exposure and positive modeling.
Should I force my child to eat vegetables?
No. Forcing children to eat can lead to negative associations with food and power struggles. It also does not work in the long run.
My toddler eats vegetables at daycare but not at home. Why?
This is common and is often about peer influence, routine, or the lack of pressure at daycare. There is no reason to be concerned. Children are often more willing to eat at daycare because of peer modeling.
What are the easiest vegetables to start with?
Start with sweeter vegetables like sweet potatoes, carrots, peas, and corn. These tend to be more palatable to toddlers than bitter vegetables.
What if my toddler gags on a vegetable?
Gagging is a normal reflex for toddlers learning to eat new textures. Continue to offer the vegetable in different forms (cooked, raw, pureed) to help them adjust.
How much should my toddler be eating?
Every child is different. Research suggests that if a child is growing well, has enough energy, and is meeting developmental milestones, they are likely eating enough. Let them decide how much to eat at each meal.
Additional Resources
- American Academy of Pediatrics (AAP) – Offers guidelines for feeding children
- Ellyn Satter’s Division of Responsibility in Feeding – A useful framework for parents
- Feeding therapists and pediatric dietitians – Can provide support for more severe feeding challenges
A Final Reminder
You are doing an incredible job. Feeding a toddler is hard work, and it is okay if it feels overwhelming sometimes. The fact that you are reading this article means you care. That alone puts you ahead of the game.
Your toddler will not remember every meal you served. They will not remember every vegetable they rejected. They will remember the love, the laughter, and the feeling of being safe and cared for.

Mom Guilt: Why It’s a Lie We Tell Ourselves
Mom Guilt :You rushed out the door this morning without packing a proper lunch. You missed your daughter’s school assembly because of a work meeting. You let your toddler watch 45 minutes of cartoons so you could finally take a shower. You said “not right now” one too many times.
And now, that familiar weight sits heavy in your chest.
Mom guilt.
It is the quiet voice that whispers you are not doing enough. It is the nagging feeling that you are somehow falling short. It is the exhausting mental ledger where you tally up all the ways you have failed your children today.
But here is the truth you need to hear: Mom guilt is not a sign that you are a bad mother. It is a sign that you care deeply. And more importantly, it is largely a lie we have been conditioned to believe.
What Is Mom Guilt, Really?
Mom guilt is the persistent feeling that you are not doing enough for your children—or that your choices are somehow harming them. It shows up in countless ways:
- Working mom guilt – “I should be spending more time with them.”
- Stay-at-home mom guilt – “I should be contributing financially.”
- Screen time guilt – “They watch too much TV.”
- Food guilt – “I should be feeding them healthier meals.”
- Patience guilt – “I lost my temper again. I am a terrible mother.”
- Self-care guilt – “Taking time for myself feels selfish.”
The list goes on. And it is exhausting.
Where Does Mom Guilt Come From?
Mom guilt did not appear out of nowhere. It is carefully cultivated by a society that expects mothers to be everything to everyone—all the time, without complaint, and with a smile.
1. Unrealistic Expectations
We have been sold an impossible ideal. The “perfect mother” is supposed to be:
- Nurturing but not overbearing
- Available but not hovering
- Career-driven but also present
- Fit but not obsessive about appearance
- Patient but not a pushover
- Creative but not messy
- Organized but not rigid
No single human being can be all of these things simultaneously. And yet, we hold ourselves to this impossible standard.
2. Social Media Comparison
Scrolling through Instagram or Facebook can feel like a highlight reel of other mothers’ lives. The perfectly curated photos, the organized playrooms, the homemade organic snacks, the smiling children in matching outfits.
What we do not see are the tantrums, the messy rooms, the burnt dinners, or the exhausted mothers behind the camera. We compare our behind-the-scenes to everyone else’s highlight reel, and we always come up short.
3. The “Martyr” Narrative
We have been raised on the idea that a “good mother” sacrifices everything for her children. We are told that self-care is selfish, that putting ourselves first is neglectful, and that our own needs should come last.
This narrative serves no one. It burns mothers out, breeds resentment, and teaches our children that mothers are not allowed to be whole people with their own needs and desires.
4. The Loss of the Village
In previous generations, mothers were surrounded by extended family, neighbors, and community. Child-rearing was a shared responsibility. Today, many mothers are isolated—raising children without the support network that once made it manageable.
When you are doing it alone, it is easy to feel like you are failing. You are not. You are simply trying to do the work of an entire village by yourself.
Research Shows Mom Guilt Is Universal
You are not alone. Studies consistently show that mom guilt is a near-universal experience:
- One survey found that 85% of mothers experience guilt about their parenting choices
- Another study found that the average mother experiences guilt at least once a day
- Research shows that work-life conflict is one of the strongest predictors of maternal guilt
The numbers tell us something important: If almost every mother feels this way, it is not a personal failure—it is a systemic issue.
Why Mom Guilt Is a Lie
1. Your Children Do Not Need a Perfect Mother
Here is the uncomfortable truth: your children do not need you to be perfect. They need you to be present. They need you to be loving. They need you to be human.
Children learn resilience by watching us make mistakes and recover. They learn compassion by seeing us extend grace to ourselves. They learn that it is okay to be imperfect—and that is one of the most important lessons we can teach them.
They do not need a perfect mother. They need a real one.
2. Guilt Does Not Make You a Better Mother
There is a pervasive myth that guilt is a sign of caring—that if we stop feeling guilty, we must stop caring. This is simply not true.
Guilt is a feeling, not a parenting tool. It does not make you more patient, more present, or more loving. It just makes you more exhausted. And an exhausted mother is not a better mother.
3. Your Needs Matter Too
For decades, mothers have been told that their needs come last. That self-care is selfish. That wanting time for yourself means you do not love your children enough.
This is not true. It has never been true.
You cannot pour from an empty cup. When you take care of yourself, you are not neglecting your children—you are ensuring that you have the energy, patience, and presence to show up for them.
4. The “Perfect” Mothers Do Not Exist
The mothers you admire—the ones who seem to have it all together—are struggling too. They just hide it better. Everyone is making it up as they go along. No one has the secret formula.
The sooner we stop comparing ourselves to an impossible ideal, the sooner we can start enjoying the motherhood we actually have.
What the Research Says About Maternal Guilt and Child Development
Important research has examined the impact of maternal guilt on children:
- Maternal guilt can negatively affect child development when it leads to inconsistent parenting, stress, and anxiety
- Children are highly sensitive to their mother’s emotional state; chronic guilt and stress can be transmitted to children
- When mothers model self-compassion, children learn to be more resilient and less self-critical
For mothers who struggle with guilt, seeking support through therapy, counseling, or support groups can be beneficial. These resources can help process feelings of guilt and develop strategies for self-compassion.
Letting Go of Mom Guilt
If you have been carrying mom guilt, it is time to put it down. Here is how to start:
1. Identify the Source
When you feel guilty, ask yourself: Where is this guilt coming from? Is it a genuine concern about your child’s well-being? Or is it an unrealistic expectation you have absorbed from society, social media, or your own childhood?
2. Reframe Your Thinking
Instead of thinking “I should be spending more time with my kids,” try “My children are loved and well-cared for, even when I am not with them.” Instead of thinking “I lost my temper again,” try “I am human, and I am modeling how to repair after a mistake.”
3. Give Yourself Permission
Give yourself permission to:
- Take time for yourself without guilt
- Say no without explanation
- Make mistakes without self-flagellation
- Do things imperfectly
- Ask for help
4. Stop Comparing
Unfollow accounts that make you feel inadequate. Remind yourself that social media is a highlight reel, not real life. Celebrate your wins, no matter how small.
5. Practice Self-Compassion
Treat yourself with the same kindness you would offer a friend. If your best friend told you she felt like a failure as a mother, you would not agree with her. You would remind her of all the ways she is doing an incredible job. Now, give yourself that same grace.
6. Focus on Connection, Not Perfection
Your children will not remember whether you made organic meals or bought pre-packaged snacks. They will not remember whether the house was spotless. They will remember how you made them feel. They will remember the laughter, the hugs, and the moments of connection.
That is what matters. That is what lasts.
Quick Permission Slips for Exhausted Mothers
Right now, you have my permission to:
- ❌ Let the laundry sit until tomorrow
- ❌ Serve breakfast for dinner
- ❌ Take a shower without rushing
- ❌ Say no to something you do not want to do
- ❌ Leave the dishes in the sink
- ❌ Stop apologizing for things that are not your fault
- ❌ Prioritize your own mental health
- ❌ Do less and be more
The Bottom Line
Mom guilt is not a sign of failure. It is a sign that you care. But it is also a lie—a story we have been told about what motherhood “should” look like, and a standard that no human can meet.
Your children do not need a perfect mother. They need a present one. They need a loving one. They need a human one.
And sometimes, being a present, loving, human mother means letting go of the guilt and allowing yourself to be exactly who you are: someone who is doing her best in an impossible situation, and that is more than enough.
Frequently Asked Questions
Is mom guilt normal?
Yes. Research shows that the vast majority of mothers experience guilt about their parenting choices. It is a common, if exhausting, part of modern motherhood.
Why do I feel guilty as a mother?
Mom guilt often stems from unrealistic societal expectations, social media comparison, the “martyr” narrative that mothers must sacrifice everything, and the loss of the village that once supported mothers.
Does mom guilt affect children?
Research suggests that maternal guilt can negatively affect child development when it leads to inconsistent parenting or high maternal stress. However, modeling self-compassion can help children develop resilience.
How can I stop feeling guilty as a mom?
Identify the source of your guilt, reframe your thinking, give yourself permission to be imperfect, stop comparing yourself to others, practice self-compassion, and focus on connection rather than perfection.
Is it selfish to take time for myself as a mother?
No. Taking time for yourself is not selfish—it is necessary. You cannot pour from an empty cup. Self-care ensures you have the energy and presence to show up for your children.
What if I made a mistake as a parent?
All parents make mistakes. The important thing is to repair, learn, and move forward. Modeling how to apologize and recover from mistakes is one of the most valuable lessons you can teach your children.
A Final Reminder
You are doing an incredible job.
You may not feel like it today. You may be looking at a sink full of dishes, a child who is having a tantrum, and an inbox that is overflowing. You may be wondering if you are ruining your children or if they will look back and think you failed.
Let me tell you something they will think: they will think of the way you held them when they were scared. They will think of the way you listened when they talked. They will think of the way you showed up, day after day, even when you were tired. They will think of you.
And that is more than enough.
Things I Wish I Knew Before Having Kids (Honest Advice From a Real Mom)
Things I Wish I Knew Before Having Kids :Nobody hands you a manual when you leave the hospital with a tiny human. You get a car seat check, a stack of pamphlets, and a whole lot of “you’ll figure it out.” And you do figure it out — eventually. But looking back, there are so many things I wish someone had told me before I had kids, not after.
If you’re pregnant, thinking about having kids, or just in the thick of early motherhood and wondering if it’s supposed to feel this hard — this one’s for you. Here’s my honest, no-filter list of things I wish I’d known before having kids.
1. “Sleep When the Baby Sleeps” Is Terrible Advice
Everyone says it. Almost no one can actually do it. Between laundry, feeding, pumping, and just wanting five minutes to yourself, napping on command isn’t realistic for most moms. What actually helped me was lowering my standards for everything else — the dishes could wait, but rest couldn’t.
What I wish I knew: Sleep deprivation is temporary, but it’s also brutal. Ask for help before you’re desperate for it, not after.
2. Your Body Won’t “Bounce Back” — And That’s Okay
Postpartum recovery isn’t a 6-week process, no matter what the discharge papers say. Your body changes permanently in ways nobody prepares you for — and that’s not a flaw, it’s the cost of growing a human. I spent way too much energy chasing my “old body” instead of appreciating what my new one could do.
3. Mom Guilt Doesn’t Wait for a Reason
You’ll feel guilty for going back to work. You’ll feel guilty for staying home. You’ll feel guilty for needing a break, and guilty for not enjoying every second. Mom guilt isn’t logical — it just shows up. Learning to recognize it as a feeling, not a fact, changed everything for me.
4. Your Marriage or Partnership Needs Maintenance Too
Kids take up so much emotional bandwidth that it’s easy to let your relationship run on autopilot. I wish I’d known how important small check-ins, five-minute conversations, and even short date nights would become — not as a luxury, but as glue.
5. The Newborn Stage Is Short — But It Doesn’t Feel Like It
Everyone tells you “it goes so fast,” and when you’re in the middle of a 3 a.m. feeding, it does not feel fast. But looking back, the newborn haze really is a blip. Try to let go of the pressure to “enjoy every moment” — some moments are just hard, and that’s allowed.
6. You Will Compare Yourself to Other Moms — Try Not To
Social media makes it look like everyone else has it figured out: matching outfits, home-cooked meals, spotless living rooms. What you don’t see is the mess right outside the frame. Comparison stole a lot of my joy in the early days. I wish I’d muted more, and lived more.
7. It’s Okay to Not Love Every Stage
Some parents love the newborn stage. Others thrive with toddlers. Some love the teenage years. Nobody loves all of it equally, and that doesn’t make you a bad parent. Give yourself permission to admit which stages are harder for you.
8. Ask for Help — Really Ask, Specifically
“Let me know if you need anything” rarely turns into actual help. What worked for me was asking for specific things: “Can you bring dinner Tuesday?” or “Can you watch the baby for an hour so I can shower?” People want to help; they just need direction.
9. Your Village Might Look Different Than You Expected
Not everyone has family nearby, and not every friendship survives the transition into parenthood. I had to build my “village” from scratch — a mix of neighbors, online mom groups, and a couple of close friends who really showed up. It doesn’t have to look traditional to be real support.
10. You Will Lose Yourself a Little — And Find Yourself Again
There’s a stretch of early motherhood where your identity feels like it disappears into diaper changes and feeding schedules. That’s normal. But slowly, in pieces, you find your way back to yourself — just with a new layer added on. Give yourself grace during that in-between time.
Final Thoughts
Nobody can fully prepare you for parenthood — some things you just have to live through to understand. But knowing you’re not alone in the hard moments can make all the difference. If you’re expecting or in the early years of motherhood, know this: you’re doing better than you think, and it’s okay to not have it all figured out.
What do you wish you’d known before having kids? Drop a comment below — I’d love to hear your story.
10 Things No One Tells You About Motherhood
Motherhood is one of those experiences you can’t fully prepare for. No matter how many books you read, how many parenting classes you take, or how many “honest” blog posts you scroll through, some truths only reveal themselves when you’re actually in the thick of it.
Here are ten things no one tells you about motherhood—the good, the hard, and the surprisingly mundane.
1. The Motherhood Guilt Is Real—And It Starts Early
You’d think the guilt would start when your child hits a difficult phase. Nope. It starts in the hospital. Did I hold them enough? Too much? Should I breastfeed or formula feed? Am I ruining them already?
The guilt follows you everywhere. You feel guilty going back to work. You feel guilty staying home. You feel guilty for wanting a break. You feel guilty for not wanting a break.
The truth is, the guilt doesn’t go away—but you do get better at recognizing that it’s not a reflection of your abilities. It’s a reflection of how much you care.
2. Your Relationship With Your Partner Will Shift—Dramatically
You know how people say having a baby brings you closer? It can. But it also introduces a level of exhaustion, stress, and logistical chaos that no romantic walk on the beach can fix.
Suddenly, every conversation is about feeding schedules, sleep regressions, and who’s getting more broken sleep. You’re both running on fumes, and patience runs thin fast.
The key isn’t to avoid the shift—it’s to recognize it and make time for connection. Even if it’s just ten minutes of talking about something other than the baby before passing out from exhaustion.
3. You Will Love Your Child More Than You Thought Possible
You’ve heard this one, but you don’t actually understand it until you experience it. The love you feel for your child is unlike anything you’ve felt before. It’s primal, overwhelming, and all-consuming.
You will do things for this tiny human that you never thought you were capable of. You’ll run on hours of sleep, go months without a proper meal, and still feel like you’d do it all over again in a heartbeat.
4. You Will Miss Your Old Life—And That’s Okay
This is the one nobody wants to admit. You love your child more than anything, but sometimes—especially in the early, sleep-deprived days—you’ll find yourself missing your old life.
The freedom to leave the house without packing a small suitcase. The luxury of an uninterrupted night’s sleep. The ability to eat a hot meal at a normal pace.
Missing your old life doesn’t mean you don’t love your new one. It just means you’re human. Give yourself grace.
5. You’ll Forget What “Rested” Feels Like
You think you know tired. You’ve pulled all-nighters in college. You’ve worked late. But motherhood tired is a different category entirely.
It’s the bone-deep exhaustion that follows you through every hour of every day. It’s the kind of tired where you forget your own birthday but remember exactly when your baby last pooped.
The good news? You adapt. Coffee and dark circles become part of your signature look.
6. Your Body Will Change—And It Might Feel Foreign
Pregnancy changes your body. Motherhood changes it again. Stretch marks, softer skin, a different shape—you might not recognize your body in the mirror at first.
Some women feel empowered by these changes. Others feel disconnected. Most feel a mix of both.
The truth is, your body did something incredible. It grew, carried, and nourished a human being. That deserves some respect, even if it takes time to feel at home in your own skin again.
7. Friends Without Kids Will Drop Off
It’s not that they don’t care. It’s that you’re living in completely different worlds now. You’re deep in the trenches of parenthood. They’re navigating life without constant tiny humans to manage.
Conversations feel harder to maintain. Spontaneous plans become impossible. Your friendship might shift, and sometimes, that shift means drifting apart.
Hold onto the friends who stick around—especially the ones who get it and offer to bring coffee without expecting a perfectly clean house.
8. You’ll Find Strength You Didn’t Know You Had
Motherhood has a way of revealing your inner strength. You’ll handle things you never thought you could—sleepless nights, endless crying, messy blowouts, and the sheer weight of responsibility.
You’ll become an expert at multitasking. You’ll learn to stay calm when everything is falling apart. You’ll discover that you’re tougher, more patient, and more resilient than you ever gave yourself credit for.
9. The Mental Load Is Real—And It’s Heavy
It’s not just the physical exhaustion. It’s the mental load—the endless list of things you’re constantly tracking. When was the last doctor’s appointment? What size clothes do they wear now? Are they developing on track?
This invisible labor is real, and it often falls disproportionately on mothers. You’re managing not just the tasks but the mental catalog of every detail.
The solution isn’t to do it all—it’s to share the load. And sometimes, that means letting go of things that don’t actually matter.
10. You’ll Never Feel “Ready”—And That’s Perfectly Normal
No one feels ready. Not really. Sure, you might have the nursery set up and the birth plan laminated, but the reality of raising a tiny human is something you can only learn by doing.
Every child is different. Every phase is new. You’ll second-guess yourself constantly. You’ll wonder if you’re doing it right.
But here’s the thing: there is no “right.” There’s just doing your best, learning as you go, and showing up every day. That’s what makes you a good mother.
The Bottom Line
Motherhood is a messy, wonderful, exhausting, beautiful journey. You’ll laugh, cry, scream into pillows, and feel a love so big it almost hurts.
You won’t be perfect. You’ll make mistakes. You’ll lose your patience. And then you’ll pick yourself up and try again.
That’s the thing about motherhood—it’s not about being perfect. It’s about showing up, even on the hard days, and loving your child the best way you know how.
And that’s more than enough.
What’s one thing no one told you about motherhood? Share in the comments below.
How to Raise Happy, Confident Kids (Without Losing Your Mind)
Every parent wants their child to grow up happy and confident. But in a world of constant comparison, academic pressure, and endless screen time, raising resilient kids can feel like an uphill battle. The good news? You don’t need to be a perfect parent to raise confident children. What you need is a consistent, intentional approach that prioritizes connection, emotional intelligence, and independence.
Here’s a practical, research-backed guide to raising happy, confident kids—without losing your sanity in the process.
Build a Strong Emotional Connection
Confidence starts with security. Children who feel deeply connected to their parents develop a strong internal foundation that allows them to explore the world with courage.
The secret: It’s not about being available 24/7. It’s about quality presence.
- Practice active listening – When your child speaks, stop what you’re doing. Make eye contact. Reflect back what you hear. This simple act communicates: “You matter. What you say matters.”
- Prioritize one-on-one time – Even 10 minutes of undivided attention daily can transform your relationship. Let your child choose the activity.
- Use connection rituals – A special handshake, a bedtime question (“What was the best part of your day?”), or a morning greeting creates predictable moments of connection.
- Repair ruptures – When you lose your temper (and you will), apologize. Modeling repair teaches children that relationships can withstand mistakes.
Research from the American Psychological Association confirms that secure attachment in childhood correlates with higher self-esteem, better emotional regulation, and stronger social skills later in life.
Foster Independence (Without Abandonment)
Confident children are capable children. They believe in their own ability to navigate challenges because they’ve been given opportunities to practice.
The secret: Let them struggle—safely.
- Allow age-appropriate risk – Let your child climb the jungle gym, walk to school, or order their own food at a restaurant. Each small risk builds self-efficacy.
- Resist the urge to rescue – When your child faces a problem, ask, “What do you think you could try?” before jumping in with solutions. The goal isn’t to remove obstacles but to teach problem-solving.
- Assign meaningful chores – Contributing to the family builds a sense of competence and belonging. Even a toddler can put toys in a basket.
- Encourage decision-making – Let children make choices: what to wear, which snack to eat, how to spend their allowance. Start small and expand as they grow.
A 2021 study in the Journal of Child and Family Studies found that children who were given age-appropriate responsibilities showed higher levels of self-confidence and resilience.
Praise Effort, Not Outcome
Many parents unknowingly undermine confidence by praising the wrong things. When you praise a child for being “smart,” they may become afraid of challenges that could disprove that label.
The secret: Praise the process, not the person.
- Use growth-mindset language – Instead of “You’re so smart,” say “I love how you kept trying even when it got hard.”
- Acknowledge effort over results – “You worked so hard on that project” matters more than “You got an A.”
- Normalize failure – Share your own mistakes and what you learned from them. Let your child see that failure is part of growth, not something to fear.
Psychologist Carol Dweck’s extensive research on mindset shows that children praised for effort rather than intelligence are more likely to embrace challenges, persist through setbacks, and achieve at higher levels.
Teach Emotional Intelligence
Happy children understand their emotions and have tools to manage them. Emotional intelligence—the ability to recognize, understand, and regulate feelings—is a stronger predictor of success than IQ.
The secret: Name it to tame it.
- Label emotions – “I can see you’re frustrated. That makes sense.” Giving feelings a name helps children process them.
- Validate without rescuing – “It’s okay to be sad” is more helpful than “Don’t cry.”
- Teach calming strategies – Deep breathing, counting to ten, or taking a break are simple tools children can use to regulate emotions.
- Model emotional regulation – When you’re stressed, say out loud, “I’m feeling overwhelmed, so I’m going to take a few deep breaths.” Children learn more from what you do than what you say.
Dr. John Gottman’s research on emotional coaching found that children whose parents validated their emotions showed better academic performance, healthier friendships, and fewer behavioral problems.
Set Boundaries with Love
Children feel safer when they know the rules. Boundaries provide structure and predictability, which reduces anxiety and builds confidence.
The secret: Be firm, kind, and consistent.
- Set clear, age-appropriate limits – “We don’t hit” is clearer than “Be nice.”
- Follow through calmly – If you set a consequence, enforce it without anger. Consistency builds trust.
- Explain the “why” – “We turn off screens at 8 PM because sleep helps your brain grow” is more effective than “Because I said so.”
- Offer choices within limits – “You can either put your shoes on now or in two minutes” gives the child a sense of control.
The American Academy of Pediatrics emphasizes that consistent, loving boundaries create a sense of security that allows children to explore the world with confidence.
Prioritize Your Own Well-Being
You cannot pour from an empty cup. The most effective parenting strategy is taking care of yourself.
The secret: Self-care isn’t selfish—it’s essential.
- Schedule time for yourself – Even 15 minutes of quiet reading or a walk around the block can reset your patience.
- Accept imperfection – Parenting is messy. You will make mistakes. Apologize, learn, and move forward.
- Build a support network – Connect with other parents who can offer perspective, humor, and a listening ear.
- Let go of comparison – Your child’s journey is unique. What works for another family may not work for yours.
A 2019 study in the Journal of Family Psychology found that parental stress significantly impacts child development. Happier, less stressed parents raise happier, more confident children.
A Quick Parenting Cheat Sheet
| Principle | What to Do | What to Avoid |
|---|---|---|
| Connection | Listen actively, prioritize one-on-one time | Being distracted, dismissing feelings |
| Independence | Allow risk, encourage problem-solving | Rescuing, overprotecting |
| Praise | Effort and process | Intelligence and talent |
| Emotions | Label, validate, teach regulation | Dismiss, punish feelings |
| Boundaries | Clear, consistent, kind | Vague, inconsistent, harsh |
| Self-Care | Prioritize rest, accept imperfection | Neglect yourself, compare |
The Bottom Line
Raising happy, confident kids isn’t about perfection—it’s about presence, consistency, and love. It’s about showing up, making mistakes, and showing them that they are enough exactly as they are.
The most confident children don’t come from families without problems. They come from families where children feel seen, heard, and loved—even when things are messy.
The goal isn’t to raise perfect children. It’s to raise children who know, deep in their bones, that they are worthy of love—and who carry that unshakeable belief into everything they do.
Frequently Asked Questions
Q: How do I raise a confident child?
Focus on connection, encourage independence, praise effort over outcome, teach emotional regulation, and model self-confidence yourself.
Q: How do I keep my child happy?
Prioritize quality time, listen actively, validate emotions, set loving boundaries, and ensure they have time for unstructured play.
Q: How do I handle a child who lacks confidence?
Start small—create opportunities for success. Let them make decisions, praise their efforts, and gently stretch their comfort zone. Avoid rescuing them from every challenge.
Q: How do I avoid losing my temper?
Use the 10-second rule—pause before responding. Practice deep breathing, take breaks when needed, and forgive yourself when you lose your cool.
Q: Is it okay to let my child fail?
Yes. Experiencing manageable failure is essential for building resilience. Let them experience consequences, then help them process what happened and what they can do differently next time.
This article is for informational purposes only and does not constitute professional parenting or psychological advice. Every child is unique; what works for one may not work for another. If you have concerns about your child’s emotional or behavioral health, consult a qualified professional.